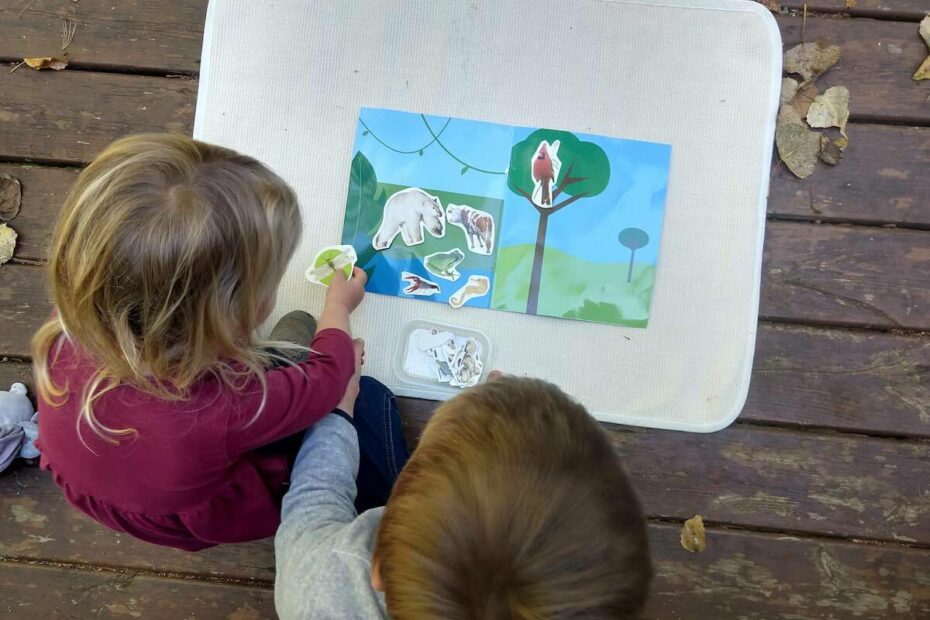
This incredibly simple Montessori DIY introduces your child to the concept of classification. Montessori geography made easy!
If you know me at all, you’ll know I am by no means a crafty, DIY person I want to be, I really do. But in reality, I’m more of an Etsy person. I love the look and feel of beautiful handmade items, but I’m not always able to pull them off myself.
All that is to say that if I post a DIY, you know it’s going to be an easy one 🙂 So don’t be scared off if you’re not super crafty. The project I’m sharing today takes about ten minutes to put together, yet my kids really enjoyed it! I’ll also share some fun extensions below.
First, a little about the Montessori Land, Air, Water lesson that inspired this simple Montessori DIY.
What is the Montessori Land, Air, Water lesson?
Land, Air, Water is a classic Montessori geography lesson in the 3-6 classroom. Children sort things based on whether they’re found in land, air, or water.
I use animals for my DIY below but you can also use vehicles or simple images of land, air, and water for this work.
As with most Montessori lessons, the teacher or parent demonstrates how to sort the items by land, air, or water and then the child has a turn. When giving the lesson, resist the temptation to explain why you’re placing each item where you are. Instead, try giving a mostly silent lesson! The silent lesson is a quintessential element of Montessori for 3-6. It allows the child to really focus on what you’re doing, rather than what you’re saying. It also makes the lesson seem special to the child.
There are so many fun ways to present this lesson!
To represent the land, air, and water, you can simply use three transparent bottles or jars. Fill one with water, one with dirt, and leave the last empty to represent the air.
Alternatively, you can use images of land, air, and water.
Finally, you can use a large picture of a landscape that includes all three elements: land, air, and water. This is what I chose to do.
You can either use images or little objects for sorting.
What does Land, Air, Water teach?
Now that we’ve covered the basics of this Montessori lesson, what is its purpose? Each Montessori lesson has both direct and indirect aims. Each is designed to teach and develop specific skills.
Of course, the most obvious purpose of Land, Air, Water is to teach children what items belong in each element. This isn’t really the most important aim of this work though!
Land, Air, Water is one of several Montessori lessons designed to introduce children to the concept of scientific classification. I always make sure to include ambiguous items. For example, you could classify a duck as belonging on land, in water, or in the air. Including things like this encourages children to really think and to understand that classification systems are designed by people and are not always simple or black and white. There is not always a “right” answer and that’s an important lesson!
This work also helps children develop organization and focus.
Montessori DIY Details – Land, Air, Water
Onto the DIY!
What you’ll need:
- An animal or vehicle sticker book. I used this animal sticker book and it worked well. I was planning to draw or paint a landscape with land, air, and water but the inside cover of this book actually has a landscape so I used that instead – even easier!
- 1-2 pieces of card stock
- A landscape image with land, air, and water if you don’t use the one in the sticker book linked above.
What to do:
- Choose which animals / vehicles you want to use and place the stickers on card stock. Cut around the images. As I mentioned above, I like to include some ambiguous ones to encourage deeper thought.
- Place the card stock images in a basket along with the landscape and you’re done!
Possible Extensions:
- Switch it up: When you notice your child losing interest in the work, switch up the animals or switch to vehicles! You can also switch to little toy animals or vehicles, like the ones found in Toob sets.
- Invite your child to create a landscape: Invite your child to draw or paint a landscape for the animals. Depending on their age and level of interest in the project, they can paint a simple picture of land, air, and water or get more detailed with a habitat for each of the animals provided.
- Create a poster: If you have a 4 or 5 year old, they may be interested in creating a land, air, water poster. Use old magazines and let your child cut out images of animals / things that belong in each place and glue them to a large paper or poster board. The library sometimes has old magazines for free! Old calendars work well for this as well.
- Classify in a different way: This is one of my favorite extensions for Montessori classification lessons! Talk with your child about how there are many ways to classify things. How else could they classify the animals? By color? By size? By animal class? By soft versus hard? So many possibilities!
If you’re looking for a non-DIY Land, Air, Water set, I think this one from Etsy is beautiful!
Want more Montessori science? Check out our Bee Study or this Week of Montessori Homeschool, which included lots of science!
This post contains affiliate links, thank you for your support!
